数学公式支持
安装 hexo-math:
1 $ npm install hexo-math --save
在Next主题配置文件更改设置为:
1 2 3 4 5 6 7 8 9 10 11 math: per_page: true mathjax: enable: true mhchem: false
在需要加载mathjax的文件的头部加入mathjax: true 或者 mathjax: false
1
2
3
4
5
6
--- title: transformer date: 2019-12-10 17:50:42 tags: mathjax: true ---
实现 Read more 隐藏多余行
第一种方法
用文本编辑器打开 themes/ 目录下的对应的主题的theme文件夹下的 _config.yml 文件,找到这段代码,如果没有则新建,可能不同的主题会不支持这种方法:
1
2
3
4
5
# Automatically Excerpt. Not recommend. # Please use in the post to control excerpt accurately. auto_excerpt: enable: false length: 150
把 enable 的 false 改成 true 就行了,然后 length 是设定文章预览的文本长度。
修改后重启 hexo 就ok了。
第二种方法
在你写 md 文章的时候,可以在内容中加上 <!--more-->,这样首页和列表页展示的文章内容就是 <!--more--> 之前的文字,而之后的就不会显示了。
效果
上面两种方式展示出来的效果是不一样的。
第一种修改 _config.yml 文件的效果是会格式化你文章的样式,直接把文字挤在一起显示,最后会有 …。
而第二种加上 <!--more-->展示出来的就是你原本文章的样式,最后不会有…。
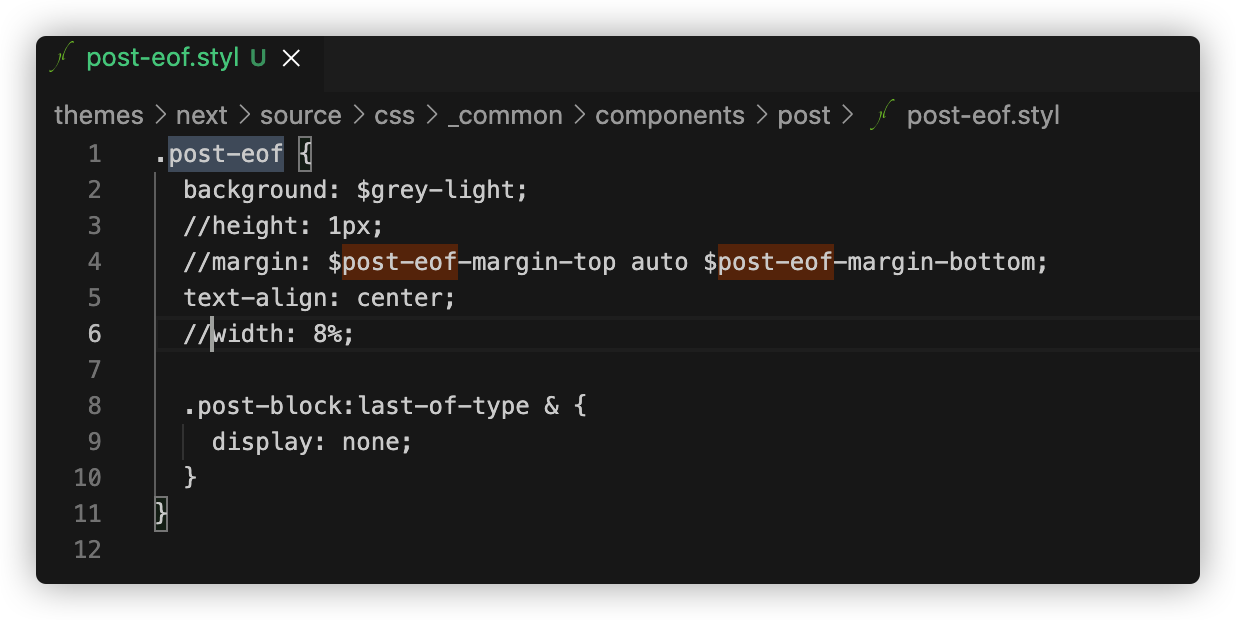
去除首页文章间隔与短横线
这里我不需要这个就需要把它删掉,这里要改的地方 hexo/themes/next/source/css/_common/components/post下的post-footer.styl文件,具体如下:
文章内链接样式
主题配置文件 next.yml 去除 styles.styl 的注释
1 style: source /_data/ styles.styl
在 hexo/source/_data 目录下新建 styles.styl 文件,添加下面内容
1
2
3
4
5
6
7
8
9
10
11
12
13
14
15
//文章中链接样式 .post-body p a { color : #0593d3 ; //border-bottom : none; &:hover { color : #ff106c ; } } a , span .exturl { border-bottom : none; &:hover { color : #ff106c ; } }
文章底部增加版权信息
主题配置文件 next.yml 修改 creative_commons 选项。
1
2
3
4
5
creative_commons: license: by-nc-sa sidebar: false post: true language:
版权格式 post-copyright.styl
1
2
3
4
5
6
7
8
9
10
.post-copyright { border-left : 3px solid $red ; border-top : 1px solid $red ; border-bottom : 1px solid $red ; border-right : 1px solid $red ; list-style : none; margin : 2em 0 0 ; padding : .5em 1em ; }
修改文章底部 tag 图标
主题配置文件 next.yml,打开底部标签 。
添加代码复制功能 (next8.X)
hexo next 8.X
在 hexo/_config.yml 下开启 highlight
1
2
3
4
5
6
7
highlight: enable: true line_number: true auto_detect: true tab_replace: '' wrap: true hljs: false
修改 hexo/themes/next/_config.yml 选择不同的风格
1
2
3
4
5
6
7
8
9
10
11
12
codeblock: highlight_theme: night eighties copy_button: enable: true show_result: true style: mac
添加代码复制功能 (next其他版本)
所用工具:clipboard.js
下载clipboard.min.js 并保存至themes\next\source\js\clipboard.min.js
在.\themes\next\source\js\下创建clipboard-use.js,添加如下内容:
1
2
3
4
5
6
7
8
9
10
11
12
13
14
15
16
17
copy !function (e, t, a ) var initCopyCode = function ( var copyHtml = '' ; copyHtml += '<button class="btn-copy" data-clipboard-snippet="">' ; copyHtml += ' <i class="fa fa-clipboard"></i><span>copy</span>' ; copyHtml += '</button>' ; $(".highlight .code pre" ).before(copyHtml); new ClipboardJS('.btn-copy' , { target: function (trigger ) return trigger.nextElementSibling; } }); } initCopyCode(); }(window , document );
在根目录\source\_data\下创建styles.styl,添加如下内容:
1
2
3
4
5
6
7
8
9
10
11
12
13
14
15
16
17
18
19
20
21
22
23
24
25
26
27
28
29
30
31
32
33
34
35
36
37
copy// 代码块复制按钮 // -------------------------------------------------- .highlight { //方便copy代码按钮(btn-copy)的定位 position : relative; } .btn-copy { display : inline-block; cursor : pointer; background-color : #eee ; background-image : linear-gradient (#fcfcfc ,#eee ); border : 1px solid #d5d5d5 ; border-radius : 3px ; -webkit-user-select: none; -moz-user-select: none; -ms-user-select: none; user-select: none; -webkit-appearance: none; font-size : 13px ; font-weight : 700 ; line-height : 20px ; color : #333 ; -webkit-transition : opacity .3s ease-in-out; -o-transition : opacity .3s ease-in-out; transition : opacity .3s ease-in-out; padding : 2px 6px ; position : absolute; right : 5px ; top : 5px ; opacity : 0 ; } .btn-copy span { margin-left : 5px ; } .highlight :hover .btn-copy { opacity : 1 ; }
4.在source\_data\下创建body-end.swig,添加如下内容:
1
2
3
copy <script type ="text/javascript" src ="/js/src/clipboard.min.js" > </script > <script type ="text/javascript" src ="/js/src/clipboard-use.js" > </script >
在next配置文件中启用styles.styl和body-end.swig:
1
2
3
copycustom_file_path: bodyEnd: source /_data/ body-end.swig style: source /_data/ styles.styl
分页功能
1 2 3 4 5 6 7 8 9 10 11 12 13 14 15 16 17 18 19 npm install --save hexo-generator-index npm install --save hexo-generator-archive cd 博客目录 vim _config.yml index_generator: path: '' per_page: 5 order_by: -date archive_generator: per_page: 50 yearly: true monthly: true
文章加密
请注意,可npm install hexo-blog-encrypt --save能导致文章目录不显示。
安装 hexo-blog-encrypt 插件。
1 npm install hexo-blog-encrypt
在需要加密的文章的 header 中添加下面内容。
1
2
3
password: 123456 abstract: 加密文章,请输入密码 123456 查看message: 请输入密码
顶部阅读进度条
主题配置文件 next.yml 中修改 reading_progress 选项。
1
2
3
4
5
reading_progress: enable: true position: top color: "#06d633" height: 3 px
Next 主题中文章的目录中文项点击不能跳转
Hexo sitemap 报 xmlParseEntityRef: no name
去掉博客文件名中的特殊字符 “&”
Blog 隐藏
hexo-generator-indexed
参考 (References)
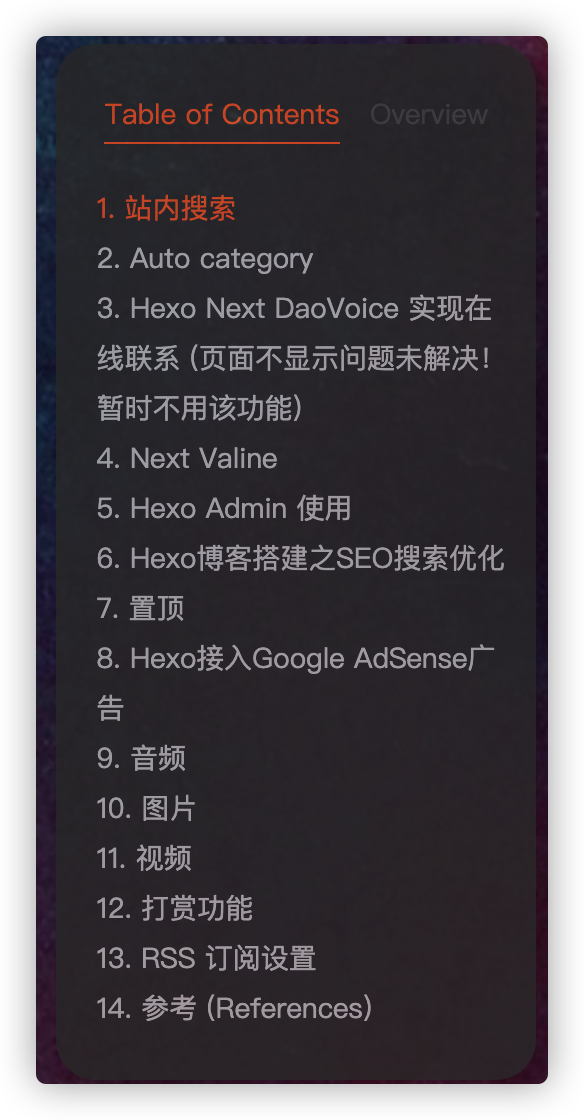 比如上面图片中所有带有的中文的都不能点击跳转到对于的内容,这个问题在 Next github 上已经解决了。 参考链接 https://github.com/kyangc/hexo-theme-next-1/commit/a3f9764ab57e157b3176f27c42481a4713f8cd94 参考链页面修改 next 主题下对应的行,代码中红色行 (带有减号) 是在你博客项目下需要删除的内容;代码中绿色行 (带有加号) 是需要你添加的内容。