站内搜索
安装hexo-generator-searchdb
1 | npm install hexo-generator-searchdb --save |
在 hexo/themes/next/_config.yml 中修改配置local_search:
1 | local_search: |
Auto category
下载 Auto Category
1 | npm install hexo-auto-category --save |
在 hexo/_config.yml 文件后添加下面的语句
1 | # Generate categories from directory-tree |
Hexo Next DaoVoice 实现在线联系 (页面不显示问题未解决!暂时不用该功能)
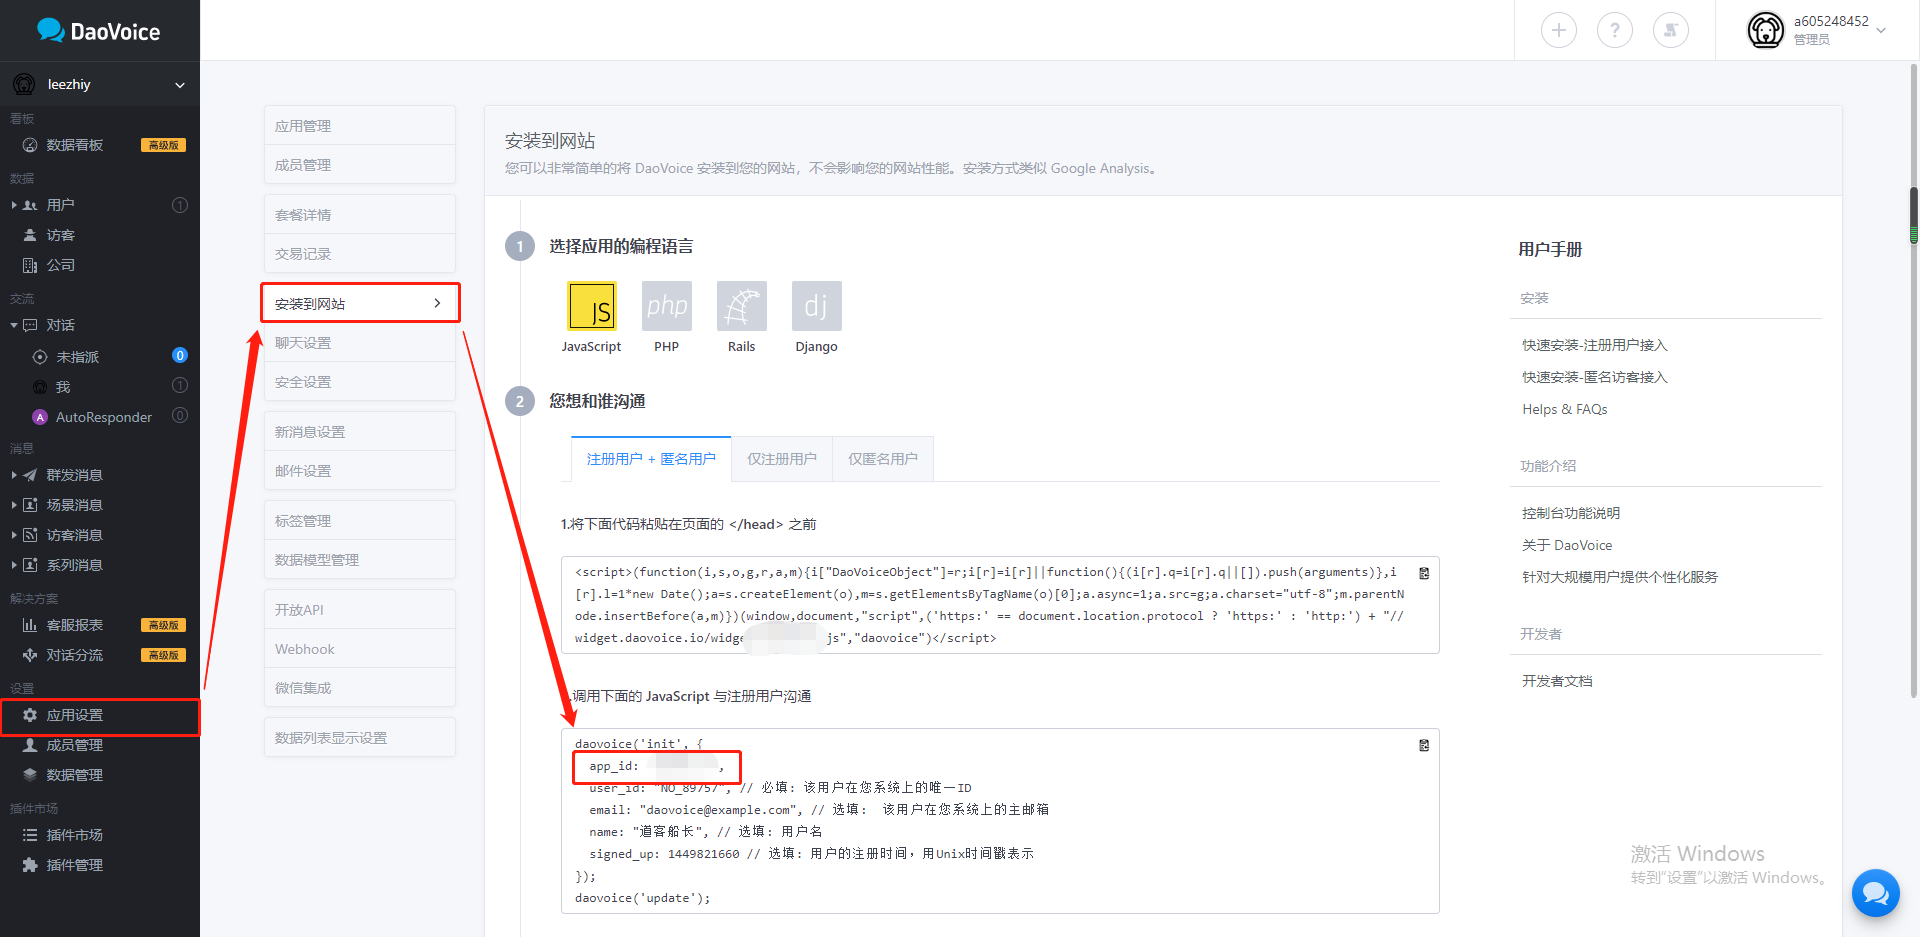
DaoVoice 注册
方法一
head.swig 修改
在文件 hexo/themes/next/layout/_partials/head/head.swig 中添加以下语句
1 | {% if theme.daovoice %} |
其中 “APP ID” 使用你在 DaoVoice 中的 “app_id”
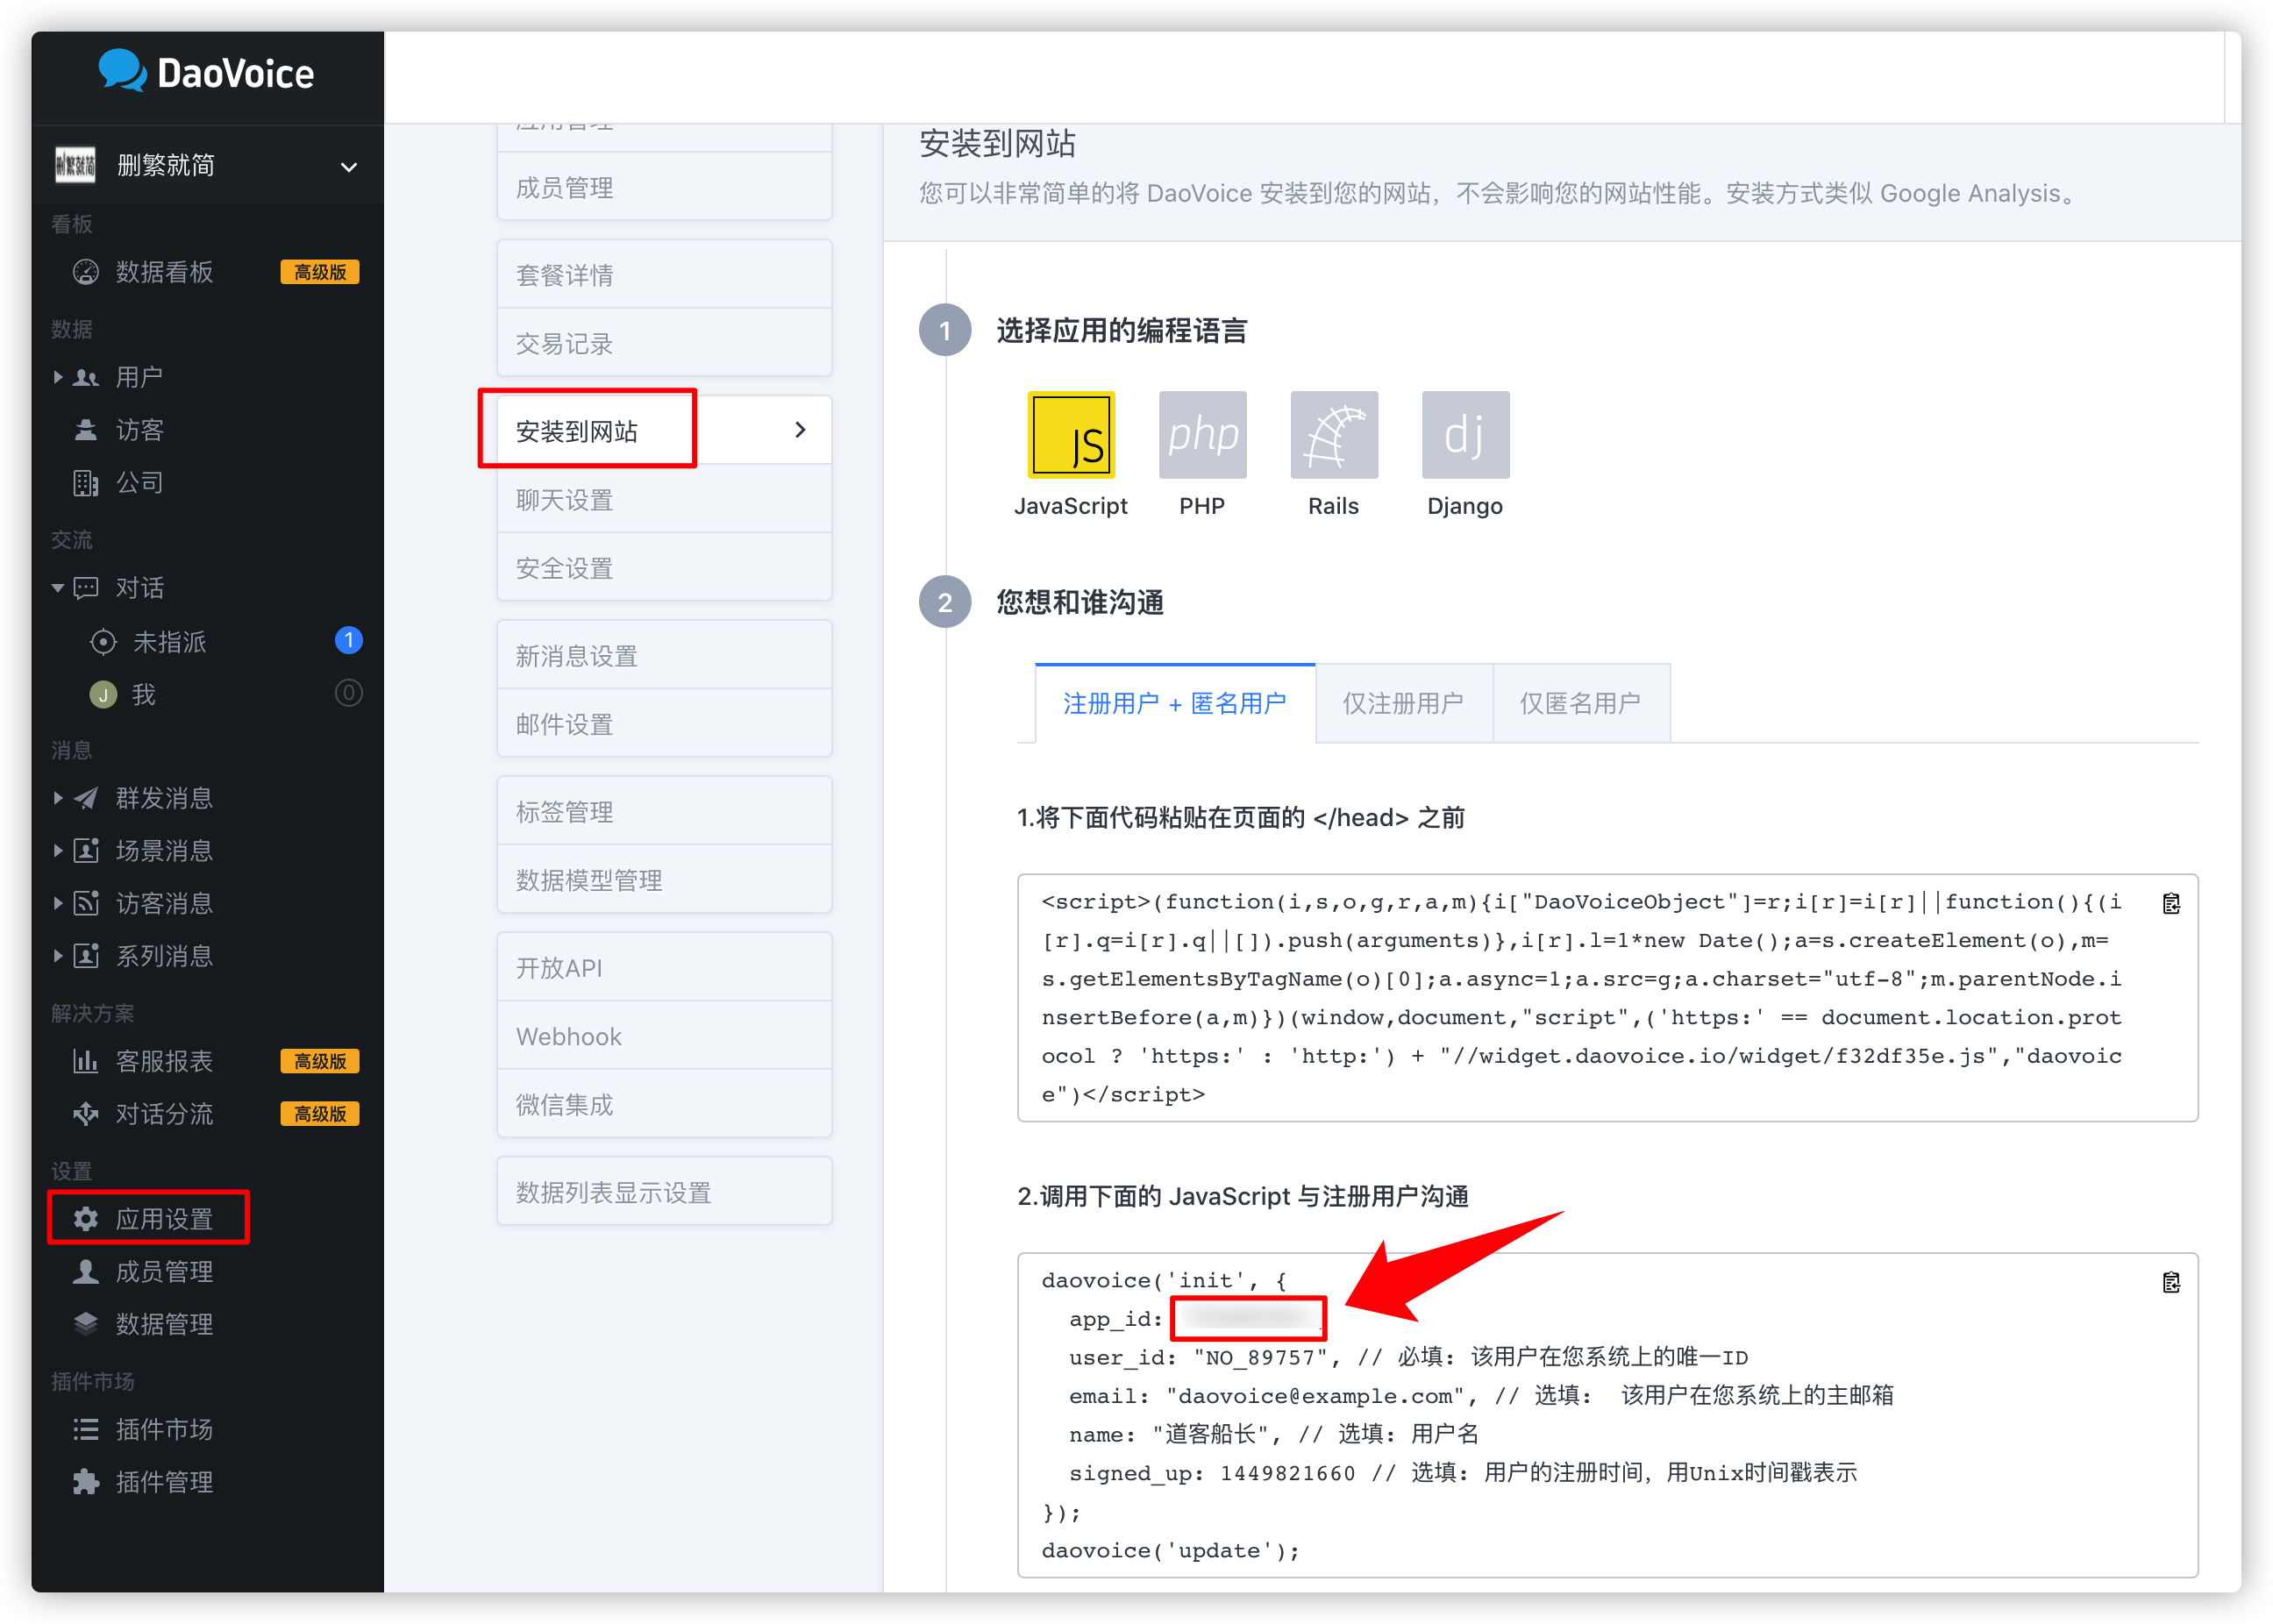
config.yml 配置文件修改
在文件 hexo/themes/next/_config.yml 中添加以下语句
1 | daovoice: true |
修改聊天图标等设置
1 | 应用设置 -> 聊天设置 -> |
部署 DaoVoice
1 | hexo clean && hexo g && hexo s |
DaoVoice 显示接入成功
方法二
利用 NexT 主题的 Injects 功能管理 DaoVoice 插件
在 NexT 使用过程中,我们免不了要安装一些 NexT 暂时未集成的插件,但我们又不想修改主题的源码,这时就需要使用 Next 的 theme-inject 功能,它通过注入代码的方式提供多个注入点实现定制内容。 Injects 具体的定义见 NexT 文档
修改配置文件
首先,打开 主题配置文件 ,在最底部添加
1 | script |
注入布局
第二步,我们在 Hexo 的 scripts 创建一个 js 文件 plugins.js(用来管理需要修改代码的第三方插件),添加以下内容。只要是这里面的脚本,Hexo 运行时会执行它。
1 | hexo.extend.filter.register('theme_inject', function (injects) { |
最后,我们创建 Hexo/source/_data/DaoVoice.swig 文件,添加以下内容。
1 | {% if daovoice.enabled %} |
运行 hexo s , 发现右下角已经出现如图下所示图标,DaoVoice 已经接入成功。
安装 hexo-cake-moon-menu 插件,并添加按钮接管 DaoVoice
安装 hexo-cake-moon-menu 插件, 在 Hexo 目录打开 git bash 并输入命令:
1 | script |
打开 站点配置文件 ,在最底部添加
1 | script |
Next Valine 评论系统
保证 next 版本最新
1 | cd hexo # 进入你的blog文件根部 |
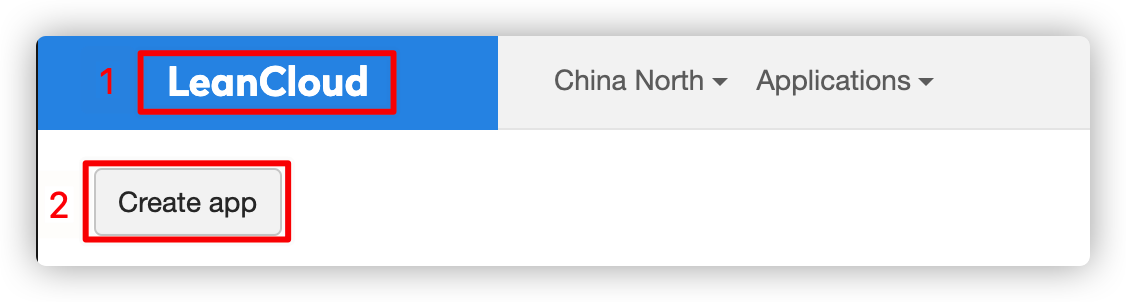
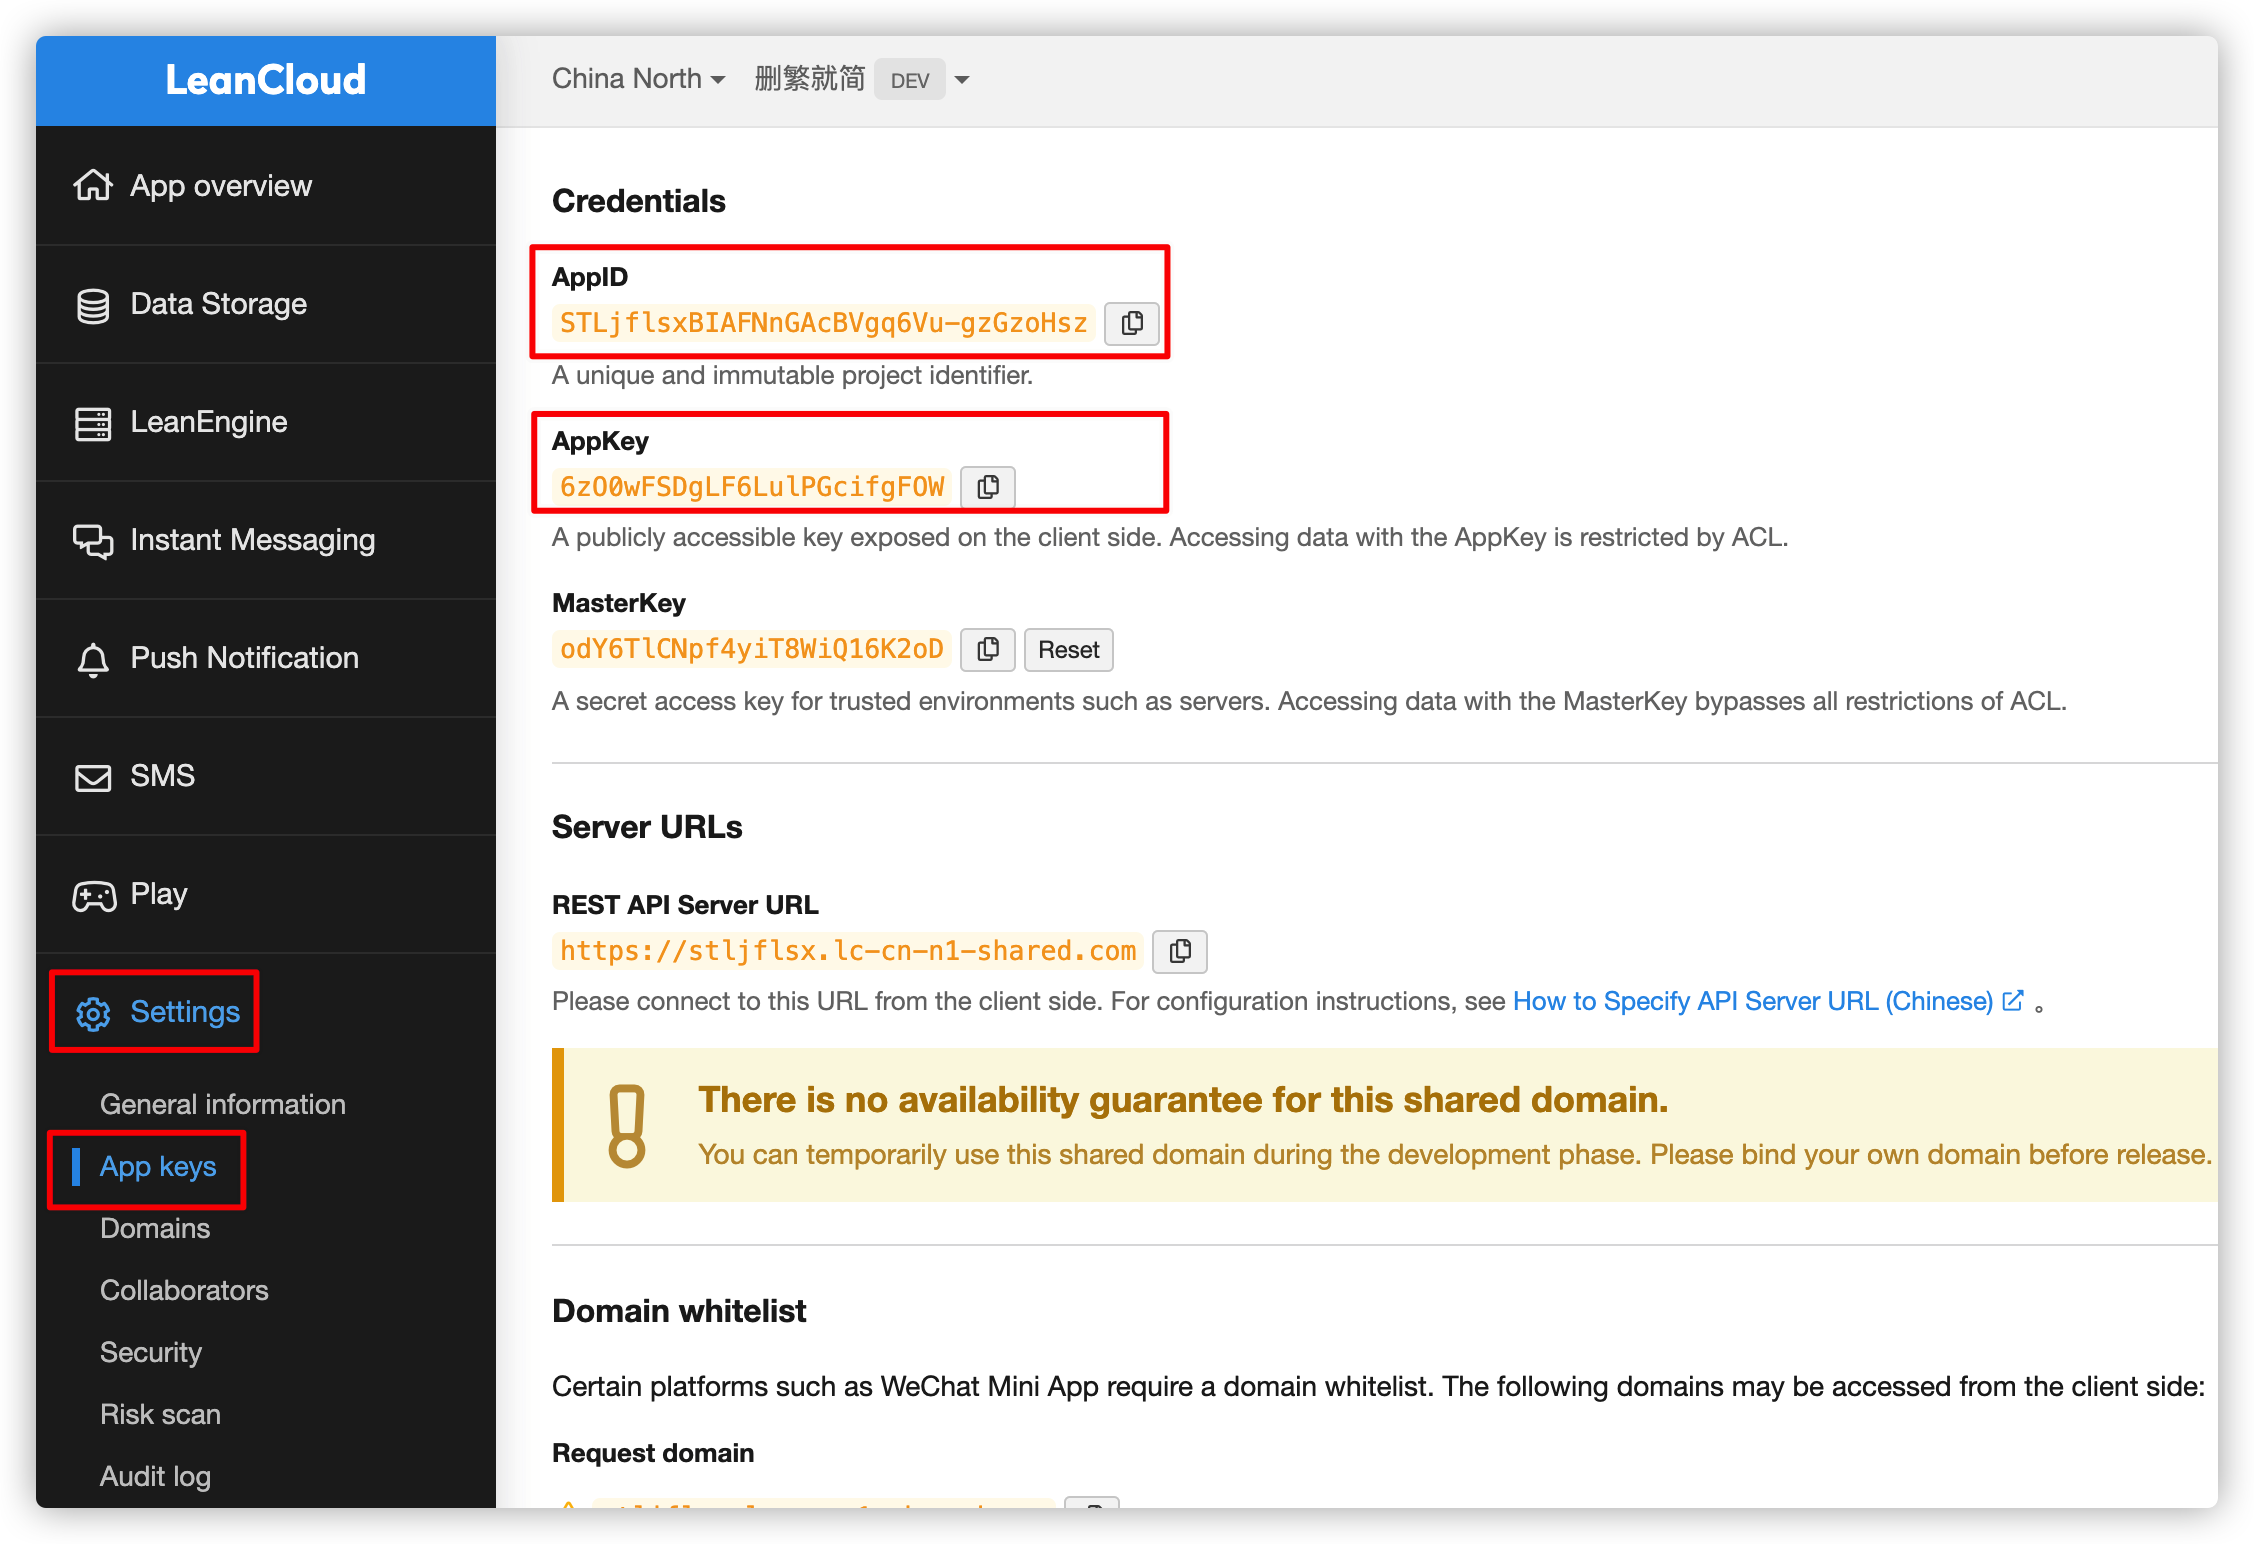
注册 LeanCloud
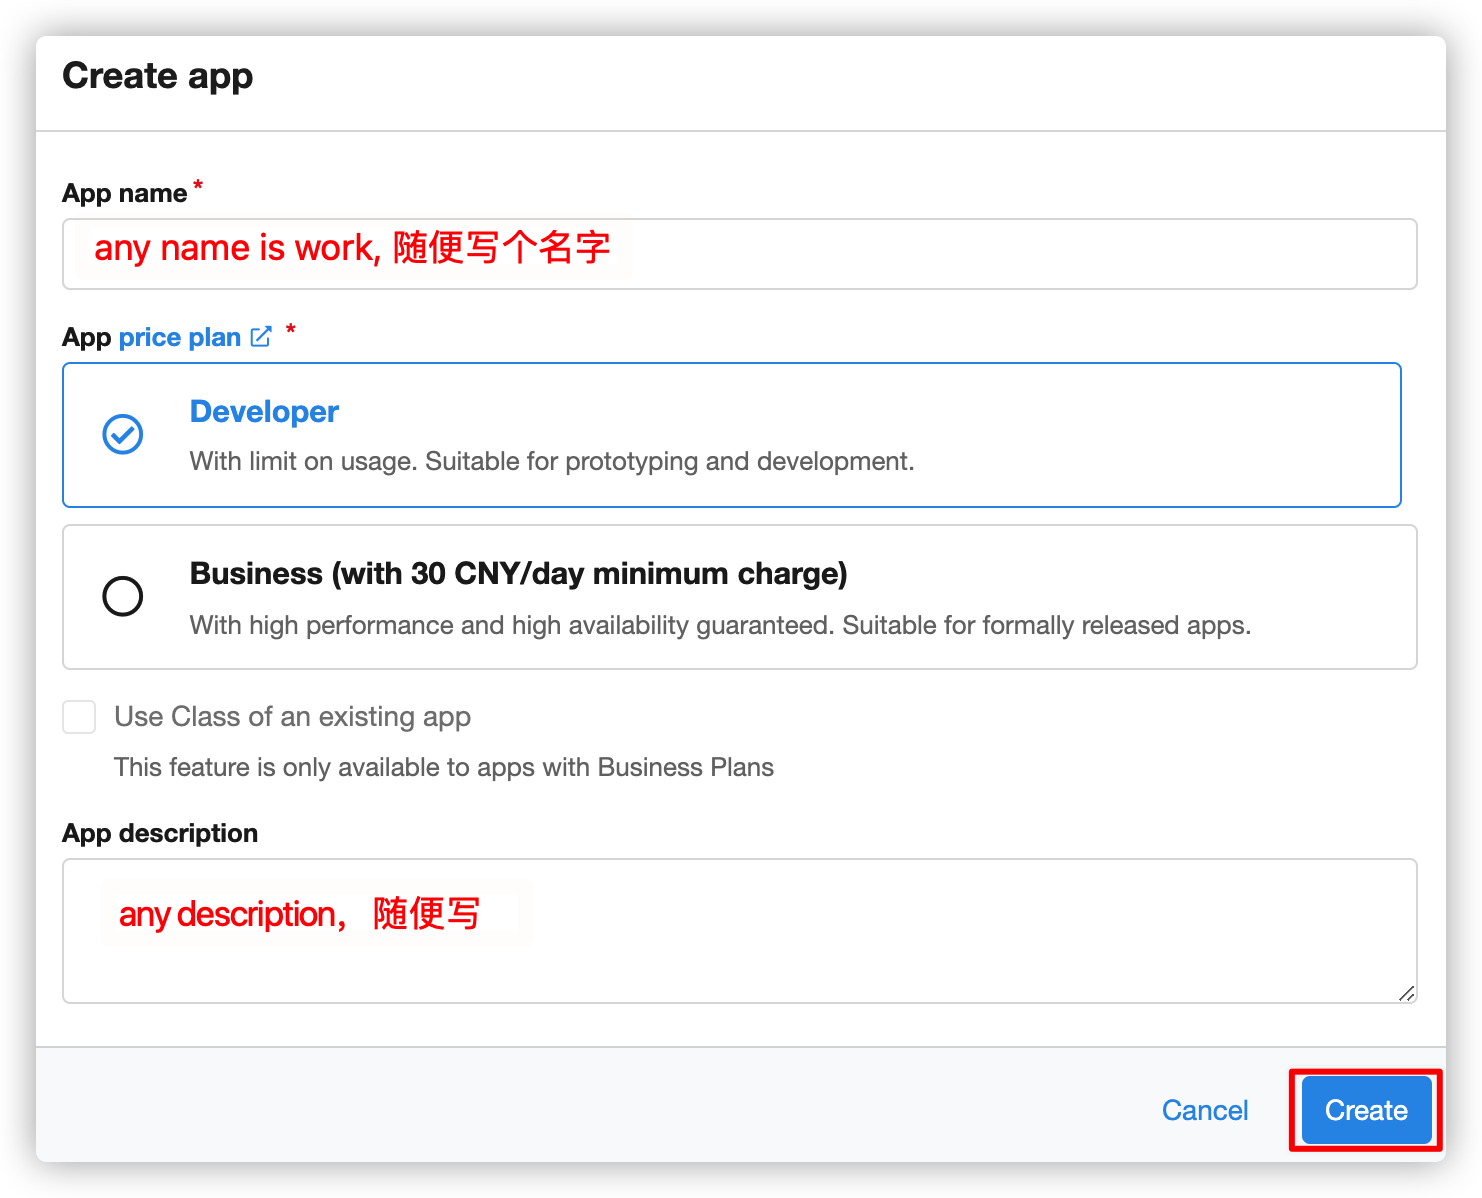
创建应用,为了获取 AppID 和 AppKey
填写 app 信息
记录 AppID 和 AppKey
Next 主题配置 valine 的配置
打开 hexo/themes/next/_config.yml,找到comments栏目并开启valine。
1 | comments: |
在 hexo/themes/next/_config.yml 搜索 valine,填入appid 和 appkey
1 | # Valine. |
评论管理
进入 leancloud 官网,找到 控制台->存储->commet 中进行管理
评论时报错
在Leancloud -> 设置 -> 安全中心 -> Web 安全域名 把你的域名 (就是你的博客主页地址) 加进去

Hexo Admin 使用
安装 Hexo Admin
进入 Hexo 根目录
1 | npm install -g hexo |
1 | npm install --save hexo-admin |
安装报错
1 | $ npm install --save hexo-admin |
解决方法
1 | npm install minimatch@"3.0.2" |
升级后依旧报错,重装:
1 | npm update minimatch |
访问 Hexo Admin
访问 http://localhost:4000/admin/
hexo deploy 按钮 报错解决 issue
打开 console,进入 hexo 目录,执行语句
1
$ touch hexo-deploy.sh; chmod a+x hexo-deploy.sh
然后 hexo 下自动创建了一个文件 hexo-deploy.sh
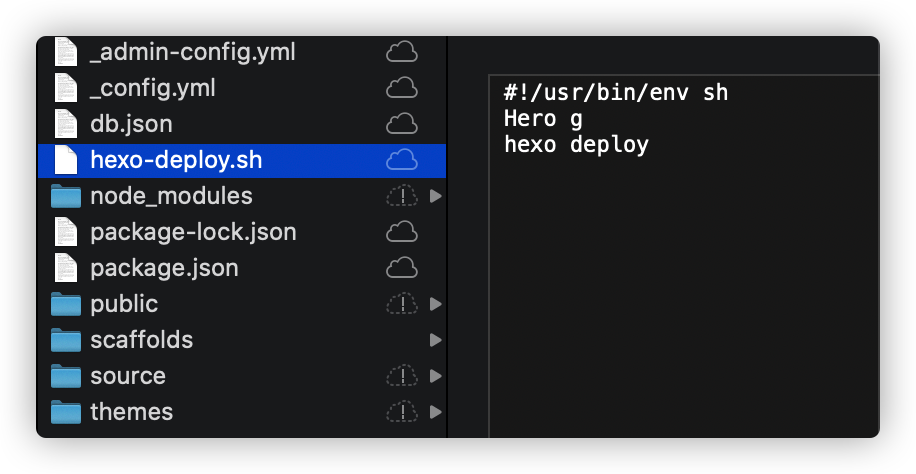
打开 hexo-deploy.sh,输入
1
2
3
hexo g
hexo d编辑 _config.yml,在文件末尾添加
1
2admin:
deployCommand: './hexo-deploy.sh'重新开启 server,进入 Hexo Admin
1
$ hexo server -d
然后可以😊的进行 deploy 了,✌️✌️✌️
Hexo博客搭建之SEO搜索优化
启用sitemap功能
为了让博文被google或百度检索,需要使用hexo的sitemap功能。修改themes/next/_config.yml:
1 | menu: |
安装插件
切换到hexo根目录下,安装搜索引擎插件,插件根据自己的需要安装其中一个或者都安装:
1 | npm install hexo-generator-sitemap --save |
对于 next 主题,直接执行如下命令即可访问站点地图:
1 | hexo g |
此时,在public的静态文件根目录中会多出一个sitemap.xml文件,表示谷歌检索的sitemap安装成功。
谷歌检索
这块在官方文档里面有提到(官方文档其实很容易上手,跟着官方走还是很容易的,有些地方可能不够详细,但是网上关于 next 的配置博客也不少,如|Hexo 优化|如何向 google 提交 sitemap(详细)),这里给出傻瓜式详细步骤:
- 在谷歌搜索栏中输入如下信息进行检索:
1 | site: xxx.github.io |
xxx为你的GitHub账号,如果没有被检索,不会显示hexo中的任何博文,如果有下面的步骤就可以省略了。
- 验证站点
需要谷歌账号,没有的可以申请一个。登录GoogleSearchConsole,点击立即使用,点击骚红色的”ADD A PROPERTY”,输入需要验证所有权的网站地址,例如本站地址
1 | https://jason-huanghao.github.io |
- 对于hexo博客网站,最好使用HTML tag法验证网站所有权,在弹出来的小框中加入你的站点地址 http://yoursite.com ,然后点击”Continue”Tab 栏选择”Alternate methods”,选中 HTML tag 可以看见
千万不要采用修改head.swig文件的方法,不然在升级 NexT 版本时会遇到很多不必要的麻烦。修改themes/next/_config.yml文件,找到 google_site_verification 字段(找不到就新建):
1 |
|
- 然后生成静态文件并发布:
1 | hexo g |
回到 Google Webmaster Central 页面,点击骚红色的”VERIFY”,done!
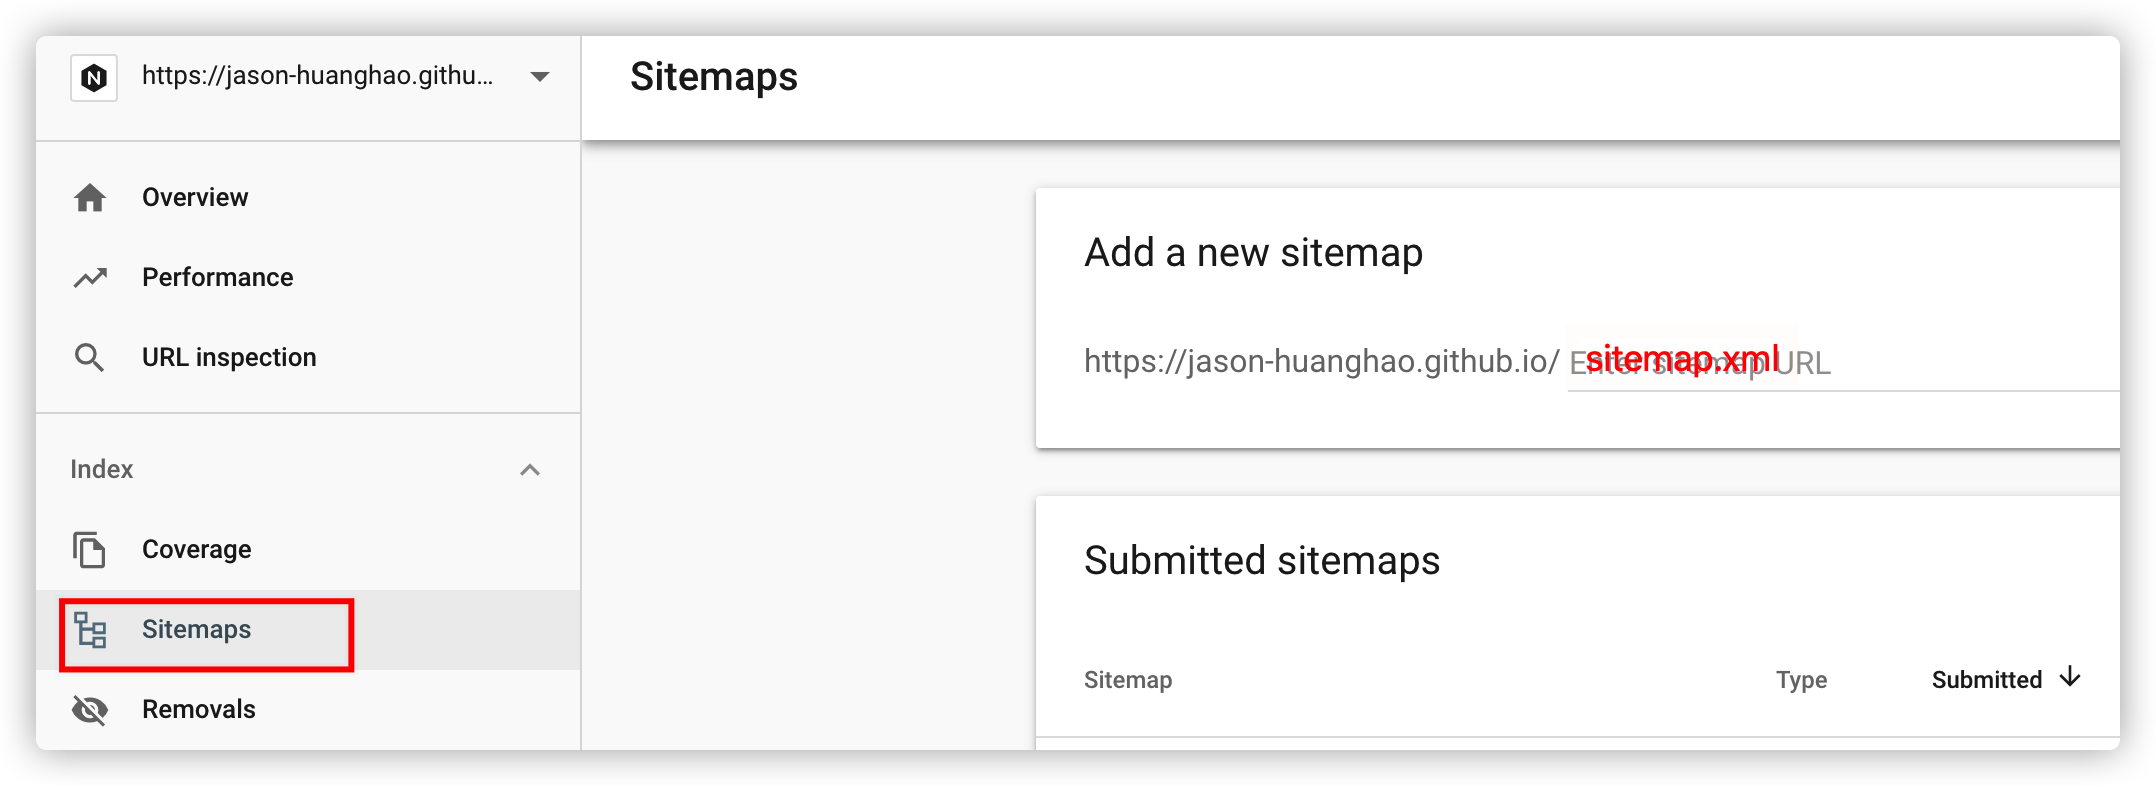
添加 sitemap.xml
打开谷歌控制台选择上一步添加的网站->索引->站点地图,在添加新的站点地图中填入”sitemap.xml”即可,添加成功会在已提交的站点地图中显示,过一段时间在概述中会显示被索引的情况。
百度检索
添加站点
登录百度资源管理平台,依次点击用户中心->站点管理->添加网站(网站会随时更新,路径可能不同,只要找到添加网站的位置就可以)。
输入网址
1
2https//eericzeng.github.io
//(注意协议头,gitpage在http基础上要加s)站点属性 最多可以选择三项,建议相关的都选上,提高曝光度
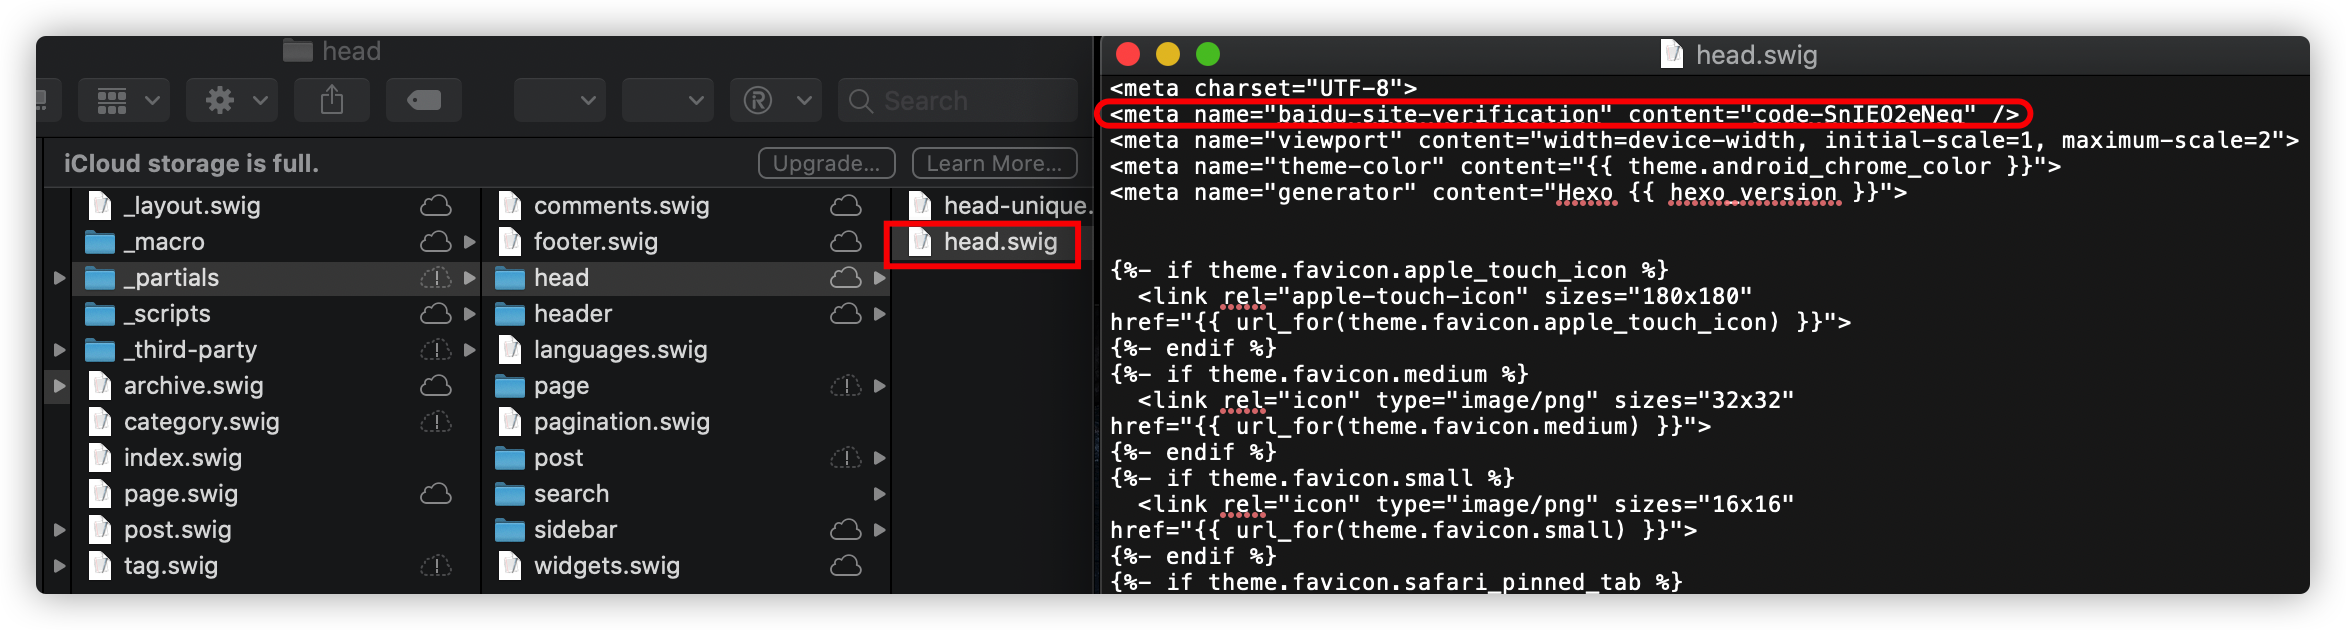
验证网站 NexT主题选择HTML标签验证即可,复制标签中的content值,修改next配置文件_config.yml:
1
2
3
4
5
6
7# Baidu Webmaster tools verification.
# See: https://ziyuan.baidu.com/site
baidu_site_verification: code-SnIEO2eNeq
# <meta name="baidu-site-verification" content="code-SnIEO2eNeq" />
# Enable baidu push so that the blog will push the url to baidu automatically which is very helpful for SEO.
baidu_push: turebaidu 验证只能修改head.swig文件
将 上面设置为 baidu_site_verification: true
百度资源页面先不要关闭,执行下面的步骤之后再点击完成验证。
发布+验证
hexo根目录下执行如下命令:
1 | hexo g |
回到百度资源网站,点击完成验证。
置顶
1 卸载原插件和安装置顶插件
执行下面两行命令:
1 | npm uninstall hexo-generator-index --save |
在新增文章的开头中加入top: true,比如:
1 |
|
2 设置置顶标志
打开**theme_macro.swig**
找到下面插入一下代码:
1 | {% if post.top %} |
至此,功能已完成。
Hexo接入Google AdSense广告
注册账号
Google Adsense 注册账号流程,入口在这里:Google Adsense
添加 Google 广告代码
- 注册账号完成之后,google会生成一段代码。
- 需要将谷歌提供给你的一份代码添加到你网站的中,因为我目前是next主题,因此放到
\themes\next\layout\partials\head.swig任意一个位置 (本人放在了最后) 即可。
1 | <script data-ad-client="ca-pub-2691877571661707" async src="https://pagead2.googlesyndication.com/pagead/js/adsbygoogle.js"></script> |
- 在你添加完成之后,
hexo gen && hexo deploy更新你的网站,点击确认,谷歌会到你的网站上进行核查和验收,一般没问题的话几分钟就会出结果,有问题的话要等待一段时间。
Google 广告投放
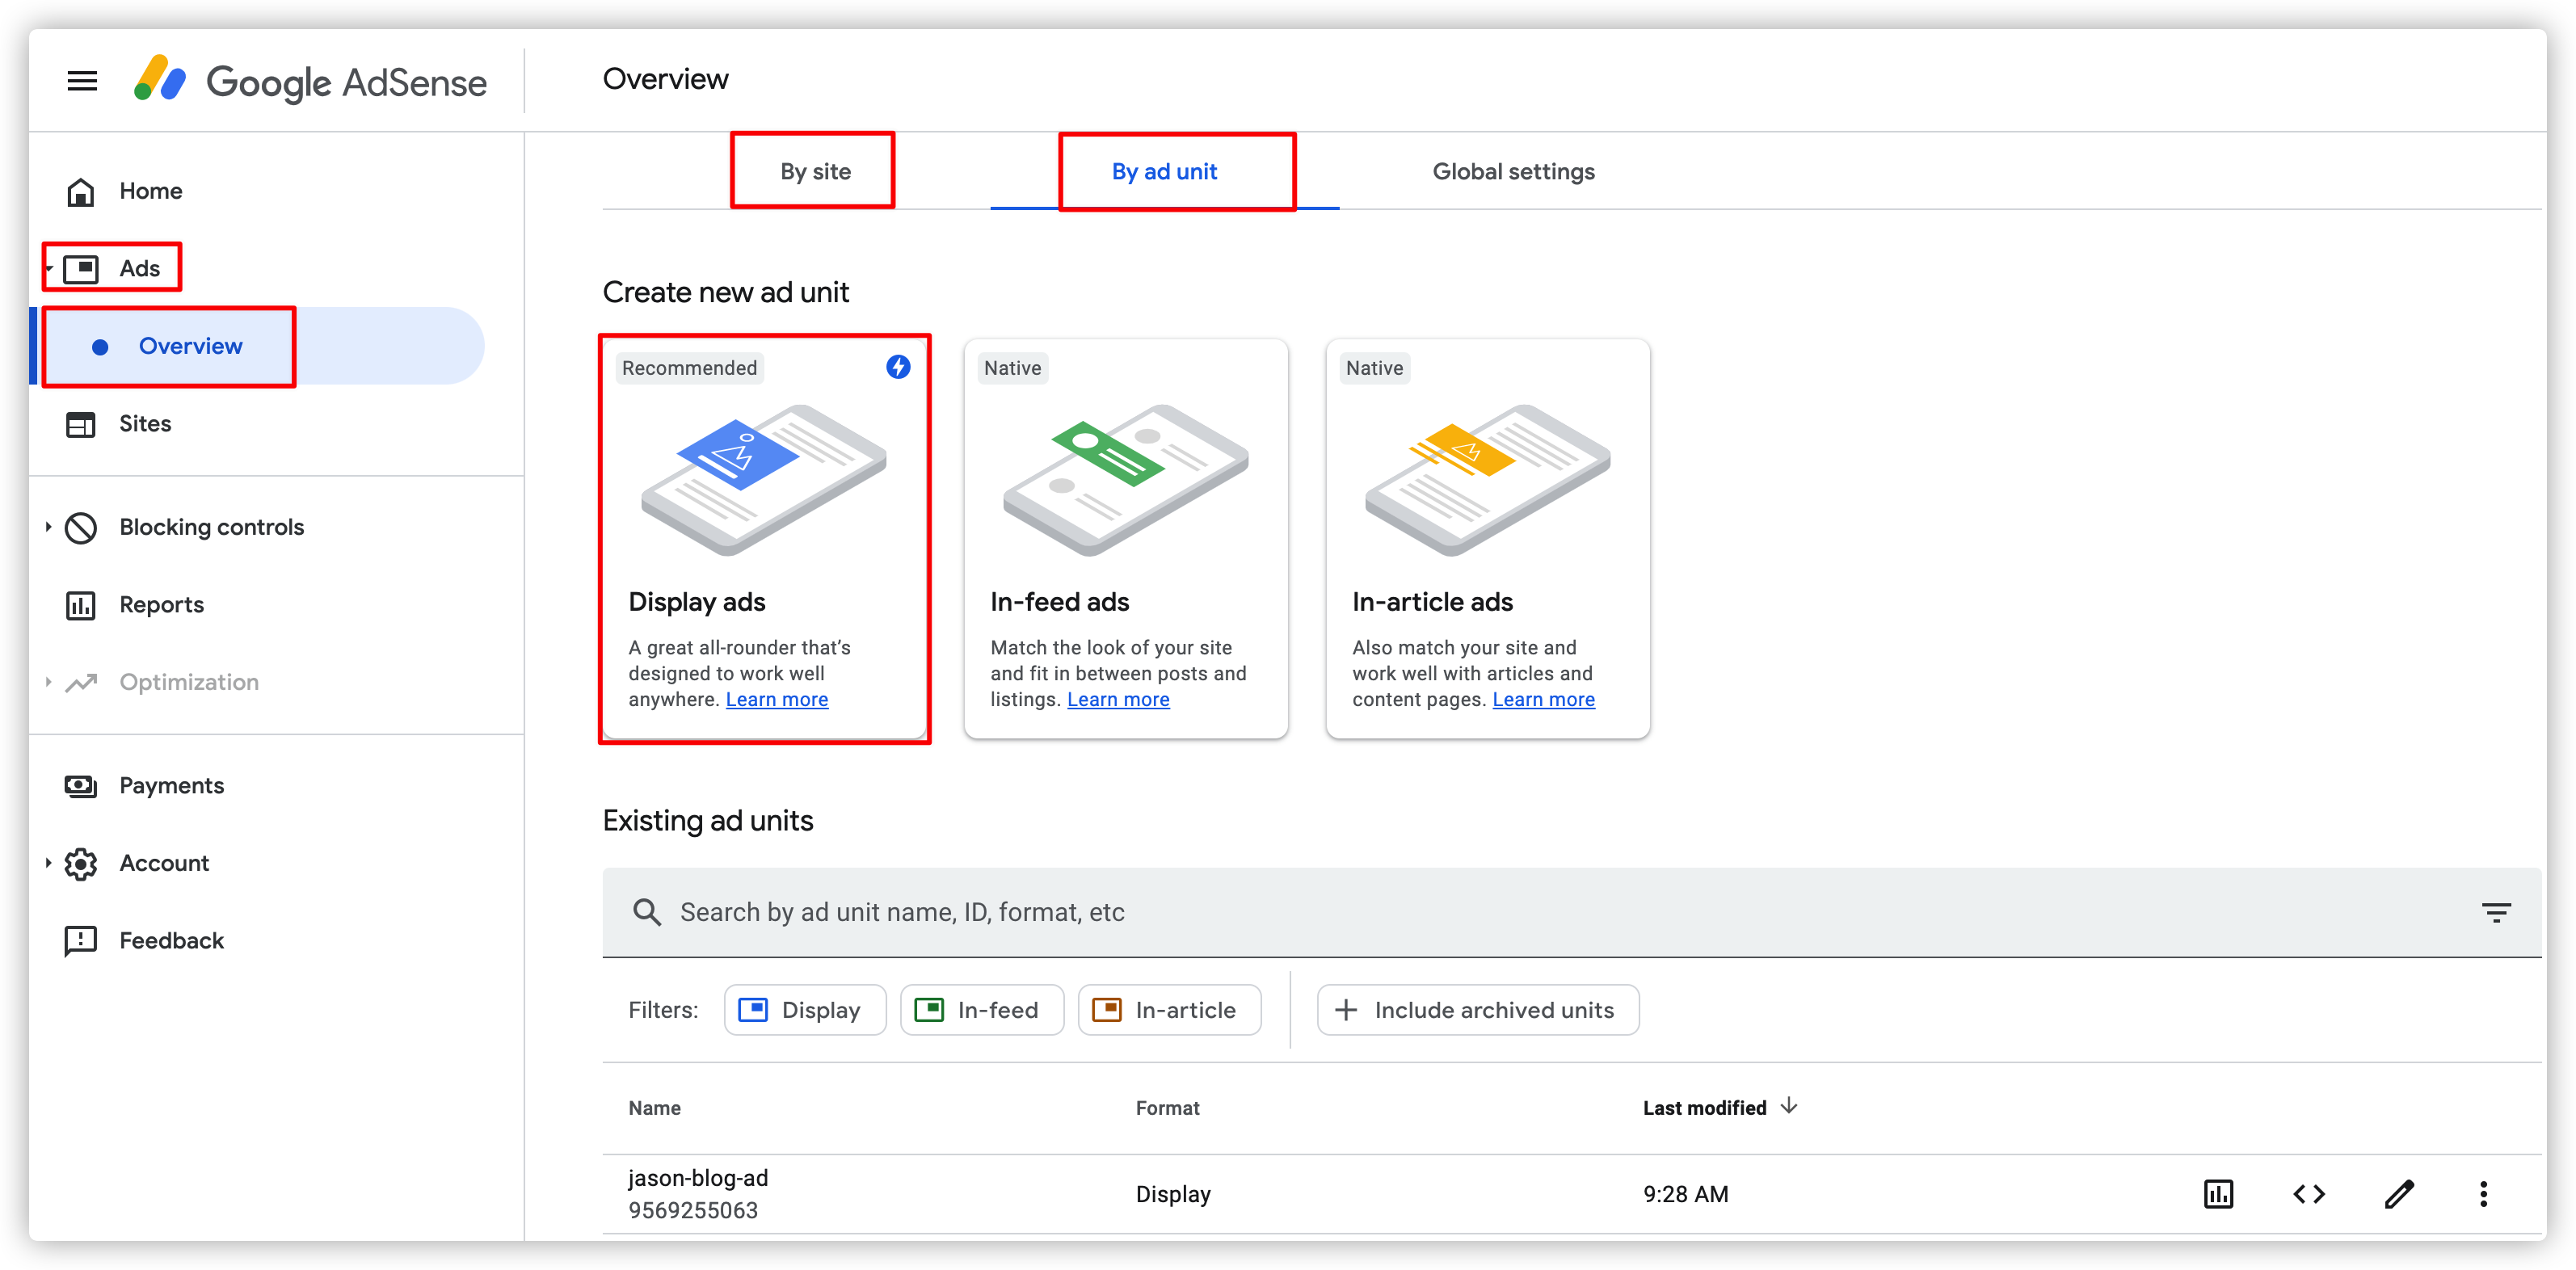
自动广告 (by site),会根据你的内容精准投放,投放概率低,不推荐
广告单元 (by ad unit),这种比较灵活,可以充分利用自己的博客广告位,推荐
- 文字广告和展示广告 (即侧边栏,评论区之类的固定广告位)
- 信息流广告 (插入在信息流内容的广告位置)
- 文章内嵌广告 (主要是插入在每篇文章内部的开始,中间,结尾部分,展示次数比较多,强烈推荐)
使用了第三种。具体的操作流程是:
在网站上,选择广告单元->新建广告位->选择对应的广告类型->生成对应的广告代码。
在themes/next/layout/_custom 下新建 google_adsense.swig 文件,将代码复制过去。
google_adsense.swig 文件引用位置决定广告展示位置,位置自己决定。
插入评论区:将代码插入_partials.swig 中的末尾即可
1
2
3
4
5
6
7
8
9
10<script async src="https://pagead2.googlesyndication.com/pagead/js/adsbygoogle.js"></script>
<ins class="adsbygoogle"
style="display:block; text-align:center;"
data-ad-layout="in-article"
data-ad-format="fluid"
data-ad-client="ca-pub-9110130131408694"
data-ad-slot="6644558881"></ins>
<script>
(adsbygoogle = window.adsbygoogle || []).push({});
</script>hexo deploy代码到github pages上,可能需要20-30分钟广告才会显示在网页上。我的很快,基本1-2分钟就显示了。
音频
参考 https://leezhiy.github.io
使用 hexo-tag-aplayer 插件
hexo-tag-aplayer 就是将 APlayer 内嵌入博客页面的 Hexo 插件。
安装执行:
1 | $ npm install --save hexo-tag-aplayer |
原先 hexo-tag-aplayer 不支持 MetingJS,使得需要图片 url,音乐 url 等等参数,操作起来都很麻烦,需要去音乐网站扒音乐播放链接或者下载下来存储在七牛云或本地,要了解具体参数和使用可以查看其中文文档了解。
MeingJS 支持 (3.0 新功能)
MetingJS 是基于 Meting API 的 APlayer 衍生播放器,引入 MetingJS 后,播放器将支持对于 QQ 音乐、网易云音乐、虾米、酷狗、百度等平台的音乐播放。
如果想在本插件中使用 MetingJS,请在 Hexo 配置文件 _config.yml 中设置:
1 | aplayer: |
接着就可以 在文章中使用 MetingJS 播放器了,例如打开网易云音乐网站找一个歌单,例如: https://music.163.com/#/playlist?id=3136952023, 这个歌单的 id 就是 3136952023,按下面格式即可使用:
1 | {% meting "3136952023" "netease" "playlist" "theme:#FF4081" "mode:circulation" "mutex:true" "listmaxheight:340px" "preload:auto" %} |
全局音乐插件
如果想在非 Post 页面使用插件功能,直接使用上面的方法修改 layout 的话会报以下错误
1 | Error: Unexpected tag "meting" |
所以我们只能使用另一种办法,创建 Hexo/source/_data/APlayer.swig 文件,添加以下内容。
接着打开 hexo/themes/next/_config.yml主题配置文件 ,在最底部添加
1 |
|
打开 hexo/scripts/plugins.js, 在 head 注入点注入 APlayer
1 | hexo.extend.filter.register('theme_inject', function (injects) { |
最后是 MetingJs 的参数详情:
| 参数名 | 默认 | description |
|---|---|---|
| id | require | 歌曲 ID / 播放列表 ID / 专辑 ID / 搜索关键字 |
| server | require | 音乐平台,可选值: ‘netease’,’tencent’,’kugou’,’xiami’,’baidu’ |
| type | require | 类型,可选值:’song’, ‘playlist’, ‘album’, ‘search’, ‘artist’ |
| auto | options | 音乐链接,支持: ‘netease’, ‘tencent’, ‘xiami’ |
| fixed | false | 开启吸底模式,详情 |
| mini | false | 开启迷你模式,详情 |
| autoplay | false | 音频自动播放 |
| theme | #2980b9 | 主题色 |
| loop | all | 音频循环播放,可选值: ‘all’, ‘one’, ‘none’ |
| order | list | 音频循环顺序,可选值: ‘list’, ‘random’ |
| preload | auto | 预加载,可选值: ‘none’, ‘metadata’, ‘auto’ |
| volume | 0.7 | 默认音量,请注意播放器会记忆用户设置,用户手动设置音量后默认音量即失效 |
| mutex | true | 互斥,阻止多个播放器同时播放,当前播放器播放时暂停其他播放器 |
| lrc-type | 0 | 详情 |
| list-folded | false | 列表默认折叠 |
| list-max-height | 340px | 列表最大高度 |
| storage-name | metingjs | 存储播放器设置的 localStorage key |
图片
视频
打赏功能
RSS 订阅设置
参考 (References)
- Post link: https://jason-huanghao.github.io/2021/05/09/Blog Building/hexo高级功能/
- Copyright Notice: All articles in this blog are licensed under BY-NC-SA unless stating additionally.